Getting started
Three steps: install the plugin, install the components you want into your Etch library, and place them on a page.
1. Install the plugin
Upload the zip under Plugins → Add New → Upload Plugin, then activate it.
The module for WooCommerce starts itself only when WooCommerce is active, so the plugin is safe to install first and configure later.
Your licence
Under Fancy Etch → License, paste your key and press Activate. Your licence unlocks automatic updates.
Everything you have built keeps working with or without it. An expired, refunded or missing licence only means updates stop arriving — a plugin that renders the cart of a live shop cannot stop working because a card expired.
2. Install the components
Open any page in Etch and press the Fancy Etch logo in the left toolbar. The panel has two levels: the modules down the left —WooCommerce and Wishlist— and the chosen module's tabs across the top, which group its components by the surface they belong to. The search box above looks through every module at once, and the panel opens again where you left it.
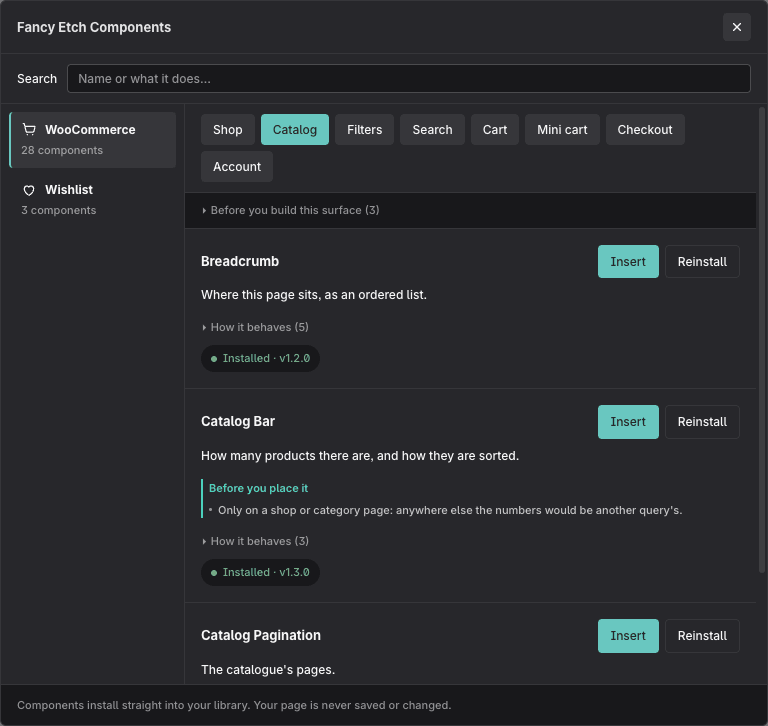
Each row tells you three things:
- What it is — one line.
- Before you place it — what has to be true for it to work. Short, and never hidden: it is the part that can leave a shop half-built.
- How it behaves — folded away, because it is worth reading once and not every time.
Press Install to add a component to your Etch library, then Insert to place it on the page you have open. A tab missing two or more offers Install them, which installs only what is missing; where there is a whole component and its pieces —the cart, the checkout, the filters— the button sits on the line between them and installs only the pieces.
Install puts the component in your project's library — your page is not saved or changed. Insert is what puts it on the page you are editing.
Keeping them up to date
When a new version of the plugin ships components that changed, a bar appears above the tabs: «N components are behind the plugin · Update all». Each module also says, under its name, how many of its own need updating. The bar only appears when there is something to do, and it updates what you already have — it never installs what you did not ask for.
An installed component is stored in your WordPress install with the markup it had the day you installed it. A plugin update does not rewrite it: press Update all after updating, or the new styles will not reach the components already on your pages.
3. Place your first component
The panel groups components by where they go, which is the question you are answering while you build:
| Tab | Where it goes |
|---|---|
| Shop | The product page |
| Catalog · Filters | The shop and category archives |
| Search | Anywhere — usually a header |
| Cart · Checkout · Account | The page WooCommerce has set for each |
| Mini cart | A header, on every page |
Within a tab, the order is the order you would place them on the page: the gallery before the price, the variation picker right before the add-to-cart.
Account only works on the page WooCommerce has set as "My account" — on any other, every one of its screens answers 404. Cart and Checkout are the same story. The panel says so on the components that need it.